Vagrant本地快速启动Kubernetes集群

Kubernetes,简称 k8s(k,8 个字符,s——明白了?)或者 “kube”,是一个开源的 Linux 容器自动化运维平台,它消除了容器化应用程序在部署、伸缩时涉及到的许多手动操作。换句话说,你可以将多台主机组合成集群来运行 Linux 容器,而 Kubernetes 可以帮助你简单高效地管理那些集群。构成这些集群的主机还可以跨越公有云、私有云以及混合云。
本文环境: * OS:Ubuntu 18.04.3 LTS * Vagrant版本:2.2.6 * VirtualBox版本:6.0.14 r133895 (Qt5.9.5) * Kubernetes版本:1.16.3
安装Vagrant
Vagrant是一个基于Ruby的工具,用于创建和部署虚拟化开发环境。它使用Oracle的开源VirtualBox(其实也可以用别的)虚拟化系统,使用Chef创建自动化虚拟环境。 首先到官网下载最新的Vagrant,现在最新的版本是2.2.6,当然你也可以通过命令行下载: 1
wget https://releases.hashicorp.com/vagrant/2.2.6/vagrant_2.2.6_x86_64.deb
Vagrant安装成功 1
2$ vagrant --version
Vagrant 2.2.6
安装VirtualBox
Vagrant是基于虚拟机(VirtualBox,VMware这些)的,所以我们还需要安装VirtualBox。在Vagrant官网可以它适配的VirtualBox版本 > Vagrant comes with support out of the box for VirtualBox, a free, cross-platform consumer virtualization product. > The VirtualBox provider is compatible with VirtualBox versions 4.0.x, 4.1.x, 4.2.x, 4.3.x, 5.0.x, 5.1.x, 5.2.x, and 6.0.x.
这里我下载6.0版本的VirtualBox,下载地址 1
wget https://download.virtualbox.org/virtualbox/6.0.14/virtualbox-6.0_6.0.14-133895~Ubuntu~bionic_amd64.deb
DKMS的: 1
DKMS isn't required by VirtualBox since 5.1.0. Which means that you downloaded VirtualBox from your Debian "store". That's a fork, not supported. You can either ask in their forums for help, or completely remove/uninstall/delete/purge their version and install the official version from the Downloads section of VirtualBox (https://www.virtualbox.org/wiki/Downloads).
启动虚拟机
Vagrant跟docker类似,可以提供一致性环境的,它可以编写Vagrantfile(类似docker-compose.yml)来定义虚拟机中安装什么软件,环境和配置,它使用ruby语法。Vagrant也做了box源,类似docker image。
下面给出一个小栗子感受下,这里使用ubuntu/xenial64(Ubuntu 16.06 64位)这个box 1
2
3
4
5
6
7
8
9
10
11
12
13
14
15
16
17
18
19
20
21
22
23
24
25
26
27
28
29
30
31
32
33
34
35
36
37
38
39
40
41
42
43
44
45
46
47
48
49
50
51
52
53
54
55
56
57
58
59
60
61
62# -*- mode: ruby -*-
# vi: set ft=ruby :
# All Vagrant configuration is done below. The "2" in Vagrant.configure
# configures the configuration version (we support older styles for
# backwards compatibility). Please don't change it unless you know what
# you're doing.
Vagrant.configure("2") do |config|
##### DEFINE VM #####
# The most common configuration options are documented and commented below.
# For a complete reference, please see the online documentation at
# https://docs.vagrantup.com.
# Every Vagrant development environment requires a box. You can search for
# boxes at https://app.vagrantup.com/boxes/search.
config.vm.box = "ubuntu/xenial64"
config.vm.hostname = "ubuntu-01"
config.vm.box_check_update = false
# Create a private network, which allows host-only access to the machine
# using a specific IP.
config.vm.network "private_network", ip: "192.168.10.50"
# Create a public network, which generally matched to bridged network.
# Bridged networks make the machine appear as another physical device on
# your network.
# config.vm.network "public_network"
# Share an additional folder to the guest VM. The first argument is
# the path on the host to the actual folder. The second argument is
# the path on the guest to mount the folder. And the optional third
# argument is a set of non-required options.
# config.vm.synced_folder "../data", "/vagrant_data"
# Provider-specific configuration so you can fine-tune various
# backing providers for Vagrant. These expose provider-specific options.
# Example for VirtualBox:
#
# config.vm.provider "virtualbox" do |vb|
# # Display the VirtualBox GUI when booting the machine
# vb.gui = true
#
# # Customize the amount of memory on the VM:
# vb.memory = "1024"
# end
#
# View the documentation for the provider you are using for more
# information on available options.
config.vm.provider "virtualbox" do |v|
v.name = "ubuntu-for-fun"
v.customize ["modifyvm", :id, "--memory", "2048"]
v.customize ["modifyvm", :id, "--cpus", "2"]
end
# Create a forwarded port mapping which allows access to a specific port
# within the machine from a port on the host machine. In the example below,
# accessing "localhost:8080" will access port 80 on the guest machine.
# config.vm.network "forwarded_port", guest: 80, host: 8080
end
在Vagrantfile对应的目录下终端键入:vagrant up,然后Vagrant会帮我们下载ubuntu/xenial64这个box,不过在中国下载速度非常慢,在运行vagrant up时我们可以看到这个box的下载url,你可以用迅雷这些工具直接下载,然后在本地手动添加box 1
2
3
4
5
6
7
8
9
10
11
12
13
14
15
16
17
18
19
20
21
22
23
24$ vagrant up
Bringing machine 'default' up with 'virtualbox' provider...
==> default: Box 'ubuntu/xenial64' could not be found. Attempting to find and install...
default: Box Provider: virtualbox
default: Box Version: >= 0
==> default: Loading metadata for box 'ubuntu/xenial64'
default: URL: https://vagrantcloud.com/ubuntu/xenial64
==> default: Adding box 'ubuntu/xenial64' (v20191217.0.0) for provider: virtualbox
default: Downloading: https://vagrantcloud.com/ubuntu/boxes/xenial64/versions/20191217.0.0/providers/virtualbox.box
==> default: Box download is resuming from prior download progress
default: Download redirected to host: cloud-images.ubuntu.com
.........
$ cd ~/box-add
$ ls
metadata.json virtualbox.box
$ vagrant box add metadata.json
==> box: Loading metadata for box 'metadata.json'
box: URL: file:///home/lucy/vm-add/metadata.json
==> box: Adding box 'ubuntu/xenial64' (v20191217.0.0) for provider: virtualbox
box: Downloading: ./virtualbox.box
==> box: Successfully added box 'ubuntu/xenial64' (v20191217.0.0) for 'virtualbox'!
$ vagrant box list
ubuntu/xenial64 (virtualbox, 20191217.0.0)https://vagrantcloud.com/ubuntu/boxes/xenial64/versions/20191217.0.0/providers/virtualbox.box,可以看到下载的版本是20191217.0.0,另外注意一下这里添加box的是使用一个metadata.json文件,使用这样的方式可以定义box版本号,它的内容是: 1
2
3
4
5
6
7
8
9
10{
"name": "ubuntu/xenial64",
"versions": [{
"version": "20191217.0.0",
"providers": [{
"name": "virtualbox",
"url": "./virtualbox.box"
}]
}]
}
启动虚拟机你可能会遇到下面的错误:
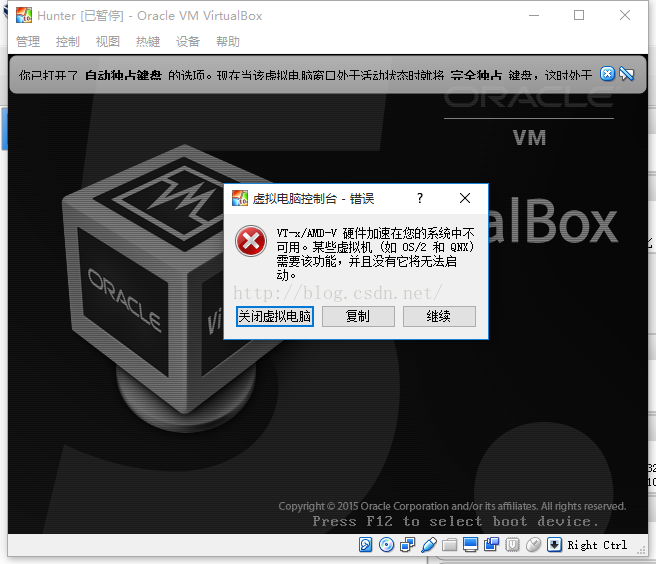
解决方法是在BIOS中将Intel Virtualization Technology改为Enable。
启动虚拟机后,你可以通过vagrant ssh进入虚拟机。
启动Kubernetes集群
这里我编写了一个Vagrantfile,一键启动集群: 1
2
3
4
5
6
7
8
9
10
11
12
13
14
15
16
17
18
19
20
21
22
23
24
25
26
27
28
29
30
31
32
33
34
35
36
37
38
39
40
41
42
43
44
45
46
47
48
49
50
51
52
53
54
55
56
57
58
59
60
61
62
63
64
65
66
67
68
69
70
71
72
73
74
75
76
77
78
79
80
81
82
83
84
85
86
87
88
89
90
91
92
93
94
95
96
97
98
99
100
101
102
103
104
105
106
107
108
109
110
111
112
113
114
115
116
117
118
119
120
121
122
123
124
125
126
127
128
129
130
131
132
133
134
135
136
137
138
139
140
141
142
143
144
145
146
147
148
149
150
151
152
153
154
155
156
157
158
159
160
161
162
163
164
165
166
167
168# -*- mode: ruby -*-
# vi: set ft=ruby :
k8sVersion = '1.16.3'
servers = [
{
:name => "k8s-head",
:type => "master",
:box => "ubuntu/xenial64",
:box_version => "20191217.0.0",
:eth1 => "192.168.205.10",
:mem => "2048",
:cpu => "2"
},
{
:name => "k8s-node-1",
:type => "node",
:box => "ubuntu/xenial64",
:box_version => "20191217.0.0",
:eth1 => "192.168.205.11",
:mem => "2048",
:cpu => "2"
},
{
:name => "k8s-node-2",
:type => "node",
:box => "ubuntu/xenial64",
:box_version => "20191217.0.0",
:eth1 => "192.168.205.12",
:mem => "2048",
:cpu => "2"
}
]
# This script to install k8s using kubeadm will get executed after a box is provisioned
$configureBox = <<-SCRIPT
cp /etc/apt/sources.list /etc/apt/sources.list.bak
# use Aliyun apt source
cat > /etc/apt/sources.list<<EOF
# 默认注释了源码镜像以提高 apt update 速度,如有需要可自行取消注释
deb https://mirrors.tuna.tsinghua.edu.cn/ubuntu/ xenial main restricted universe multiverse
# deb-src https://mirrors.tuna.tsinghua.edu.cn/ubuntu/ xenial main restricted universe multiverse
deb https://mirrors.tuna.tsinghua.edu.cn/ubuntu/ xenial-updates main restricted universe multiverse
# deb-src https://mirrors.tuna.tsinghua.edu.cn/ubuntu/ xenial-updates main restricted universe multiverse
deb https://mirrors.tuna.tsinghua.edu.cn/ubuntu/ xenial-backports main restricted universe multiverse
# deb-src https://mirrors.tuna.tsinghua.edu.cn/ubuntu/ xenial-backports main restricted universe multiverse
deb https://mirrors.tuna.tsinghua.edu.cn/ubuntu/ xenial-security main restricted universe multiverse
# deb-src https://mirrors.tuna.tsinghua.edu.cn/ubuntu/ xenial-security main restricted universe multiverse
EOF
export DEBIAN_FRONTEND=noninteractive
# install docker v17.03
# reason for not using docker provision is that it always installs latest version of the docker, but kubeadm requires 17.03 or older
apt-get update
# step 1: 安装必要的一些系统工具
apt-get install -y apt-transport-https ca-certificates curl software-properties-common
# step 2: 安装GPG证书
curl -fsSL http://mirrors.aliyun.com/docker-ce/linux/ubuntu/gpg | sudo apt-key add -
add-apt-repository "deb [arch=amd64] http://mirrors.aliyun.com/docker-ce/linux/$(. /etc/os-release; echo "$ID") $(lsb_release -cs) stable"
apt-get update && apt-get install -y docker-ce=$(apt-cache madison docker-ce | grep 17.03 | head -1 | awk '{print $3}')
# run docker commands as vagrant user (sudo not required)
usermod -aG docker vagrant
# 修改docker配置
sudo bash -c 'cat > /etc/docker/daemon.json <<EOF
{
"exec-opts": ["native.cgroupdriver=systemd"],
"log-driver": "json-file",
"log-opts": {
"max-size": "100m"
},
"storage-driver": "overlay2"
}
EOF'
sudo systemctl daemon-reload
sudo systemctl restart docker
# install kubeadm
apt-get install -y apt-transport-https curl
curl -s https://mirrors.aliyun.com/kubernetes/apt/doc/apt-key.gpg | sudo apt-key add - # aliyun GPG
cat <<EOF >/etc/apt/sources.list.d/kubernetes.list
deb https://mirrors.aliyun.com/kubernetes/apt/ kubernetes-xenial main
EOF
apt-get update
apt-get install -y kubelet=#{k8sVersion}-00 kubeadm=#{k8sVersion}-00 kubectl=#{k8sVersion}-00
apt-mark hold kubelet kubeadm kubectl
# kubelet requires swap off
swapoff -a
# keep swap off after reboot
sudo sed -i '/ swap / s/^\(.*\)$/#\1/g' /etc/fstab
# ip of this box
IP_ADDR=`ifconfig enp0s8 | grep Mask | awk '{print $2}'| cut -f2 -d:`
# set node-ip
sudo sh -c 'echo KUBELET_EXTRA_ARGS= >> /etc/default/kubelet'
sudo sed -i "/^[^#]*KUBELET_EXTRA_ARGS=/c\KUBELET_EXTRA_ARGS=--node-ip=$IP_ADDR" /etc/default/kubelet
sudo systemctl restart kubelet
SCRIPT
$configureMaster = <<-SCRIPT
export DEBIAN_FRONTEND=noninteractive
echo "This is master"
# ip of this box
IP_ADDR=`ifconfig enp0s8 | grep Mask | awk '{print $2}'| cut -f2 -d:`
# install k8s master
HOST_NAME=$(hostname -s)
kubeadm init --image-repository registry.aliyuncs.com/google_containers --kubernetes-version v#{k8sVersion} \
--apiserver-advertise-address=$IP_ADDR --apiserver-cert-extra-sans=$IP_ADDR --node-name $HOST_NAME --pod-network-cidr=172.16.0.0/16
#copying credentials to regular user - vagrant
sudo --user=vagrant mkdir -p /home/vagrant/.kube
cp -i /etc/kubernetes/admin.conf /home/vagrant/.kube/config
chown $(id -u vagrant):$(id -g vagrant) /home/vagrant/.kube/config
# install Calico pod network addon
export KUBECONFIG=/etc/kubernetes/admin.conf
wget https://docs.projectcalico.org/v3.10/getting-started/kubernetes/installation/hosted/kubernetes-datastore/calico-networking/1.7/calico.yaml
# Pod的ip范围
sed -i 's/192.168.0.0/172.16.0.0/g' calico.yaml
kubectl apply -f calico.yaml
kubeadm token create --print-join-command >> /etc/kubeadm_join_cmd.sh
chmod +x /etc/kubeadm_join_cmd.sh
# required for setting up password less ssh between guest VMs
sudo sed -i "/^[^#]*PasswordAuthentication[[:space:]]no/c\PasswordAuthentication yes" /etc/ssh/sshd_config
sudo service sshd restart
SCRIPT
$configureNode = <<-SCRIPT
export DEBIAN_FRONTEND=noninteractive
echo "This is worker"
apt-get install -y sshpass
sshpass -p "vagrant" scp -o StrictHostKeyChecking=no vagrant@192.168.205.10:/etc/kubeadm_join_cmd.sh .
sh ./kubeadm_join_cmd.sh
SCRIPT
Vagrant.configure("2") do |config|
servers.each do |opts|
config.vm.define opts[:name] do |config|
config.vm.box = opts[:box]
config.vm.box_version = opts[:box_version]
config.vm.hostname = opts[:name]
config.vm.network :private_network, ip: opts[:eth1]
config.vm.provider "virtualbox" do |v|
v.name = opts[:name]
v.customize ["modifyvm", :id, "--groups", "/Salamander Development"]
v.customize ["modifyvm", :id, "--memory", opts[:mem]]
v.customize ["modifyvm", :id, "--cpus", opts[:cpu]]
v.customize ["modifyvm", :id, "--natdnshostresolver1", "on"]
v.customize ["modifyvm", :id, "--natdnsproxy1", "on"]
end
# we cannot use this because we can't install the docker version we want - https://github.com/hashicorp/vagrant/issues/4871
#config.vm.provision "docker"
config.vm.provision "shell", inline: $configureBox
if opts[:type] == "master"
config.vm.provision "shell", inline: $configureMaster
else
config.vm.provision "shell", inline: $configureNode
end
end
end
endvagrant up,这里需要耐心等待几分钟,因为要启动三个虚拟机、安装一些软件和设置环境。
启动集群后,进入Master节点vagrant ssh k8s-head查看集群状态: 1
2
3
4
5
6
7
8
9
10
11
12
13
14
15
16
17
18
19
20
21
22
23
24
25
26
27
28
29
30
31$ kubectl get nodes
NAME STATUS ROLES AGE VERSION
k8s-head Ready master 5h7m v1.15.7
k8s-node-1 Ready <none> 5h5m v1.15.7
k8s-node-2 Ready <none> 5h2m v1.15.7
$ kubectl get pods --all-namespaces
NAMESPACE NAME READY STATUS RESTARTS AGE
kube-system calico-node-j5kw8 2/2 Running 4 5h7m
kube-system calico-node-kq89s 2/2 Running 0 5h6m
kube-system calico-node-twvdl 2/2 Running 0 5h2m
kube-system coredns-94d74667-jhjl8 1/1 Running 2 5h7m
kube-system coredns-94d74667-qd9qv 1/1 Running 2 5h7m
kube-system etcd-k8s-head 1/1 Running 2 5h6m
kube-system kube-apiserver-k8s-head 1/1 Running 2 5h6m
kube-system kube-controller-manager-k8s-head 1/1 Running 2 5h6m
kube-system kube-proxy-7d8wj 1/1 Running 0 5h2m
kube-system kube-proxy-hn89g 1/1 Running 0 5h6m
kube-system kube-proxy-t8qf9 1/1 Running 2 5h7m
kube-system kube-scheduler-k8s-head 1/1 Running 2 5h6m
$ kubectl cluster-info
Kubernetes master is running at https://192.168.205.10:6443
KubeDNS is running at https://192.168.205.10:6443/api/v1/namespaces/kube-system/services/kube-dns:dns/proxy
$ kubectl get componentstatuses
NAME STATUS MESSAGE ERROR
scheduler Healthy ok
controller-manager Healthy ok
etcd-0 Healthy {"health":"true"}kubectl cluster-info可以查看集群信息,kubectl get componentstatuses可以查看各组件信息。
安装官方Dashboard
Dashboard是Kubernetes的一个插件,代码单独放在Github的一个仓库里。
按照官方文档,步骤也蛮简单的,首先执行命令: 1
$ kubectl apply -f https://raw.githubusercontent.com/kubernetes/dashboard/v2.0.0-beta8/aio/deploy/recommended.yaml
查看一下Dashboard的服务: 1
2
3
4
5
6
7
8
9
10
11
12
13
14
15
16
17
18
19
20
21
22
23
24
25
26
27
$ kubectl get pod,deploy,svc -n kubernetes-dashboard
NAME READY STATUS RESTARTS AGE
pod/dashboard-metrics-scraper-6c554969c6-jqhjx 1/1 Running 0 5h5m
pod/kubernetes-dashboard-56c5f95c6b-jrj58 1/1 Running 5 5h5m
NAME READY UP-TO-DATE AVAILABLE AGE
deployment.extensions/dashboard-metrics-scraper 1/1 1 1 5h5m
deployment.extensions/kubernetes-dashboard 1/1 1 1 5h5m
NAME TYPE CLUSTER-IP EXTERNAL-IP PORT(S) AGE
service/dashboard-metrics-scraper ClusterIP 10.106.117.224 <none> 8000/TCP 5h5m
service/kubernetes-dashboard ClusterIP 10.98.23.78 <none> 443/TCP 5h5m
# 我们可以看到官方的dashboard帮我们启动了web-ui,并且帮我们启动了一个Metric服务
# 但是dashboard默认使用的https的443端口
# 测试下Dashboard是否正常
$ curl https://10.98.23.78:443 -k -I
HTTP/1.1 200 OK
Accept-Ranges: bytes
Cache-Control: no-store
Content-Length: 1262
Content-Type: text/html; charset=utf-8
Last-Modified: Fri, 06 Dec 2019 15:14:02 GMT
Date: Tue, 31 Dec 2019 06:35:55 GMT
访问Dashboard
访问Dashboard有好几种方式 * 将kubernetes-dashboard Service暴露 NodePort,使用 http://NodeIP:nodePort 地址访问 dashboard * 使用Ingress之类的入口服务进行代理访问 * 通过 API server 访问 dashboard(https 6443端口和http 8080端口方式) * 通过 kubectl proxy 访问 dashboard
kubectl proxy
首先这里我们通过kubectl proxy,在k8s-head节点执行: 1
$ kubectl proxy --address='0.0.0.0' --accept-hosts='^*$'
1
2
3
4
5
6
7
8
9
10
11
12
13
14
15
16
17
18
19
20
21apiVersion: v1
kind: ServiceAccount
metadata:
name: admin-user
namespace: kubernetes-dashboard
---
apiVersion: rbac.authorization.k8s.io/v1
kind: ClusterRoleBinding
metadata:
name: admin-user
roleRef:
apiGroup: rbac.authorization.k8s.io
kind: ClusterRole
name: cluster-admin
subjects:
- kind: ServiceAccount
name: admin-user
namespace: kubernetes-dashboardkubectl apply -f dashboard-adminuser.yaml。
查看用户token(之后在浏览器中输入) 1
2
3
4
5
6
7
8
9
10
11
12
13
14$ kubectl -n kubernetes-dashboard describe secret $(kubectl -n kubernetes-dashboard get secret | grep admin-user | awk '{print $1}')
Name: admin-user-token-mxmtr
Namespace: kubernetes-dashboard
Labels: <none>
Annotations: kubernetes.io/service-account.name: admin-user
kubernetes.io/service-account.uid: 54ddc041-f3af-41fa-a824-6a3e29f0ffa3
Type: kubernetes.io/service-account-token
Data
====
ca.crt: 1025 bytes
namespace: 20 bytes
token: eyJhbGciOiJSUzI1NiIsImtpZCI6IiJ9.eyJpc3MiOiJrdWJlcm5ldGVzL3NlcnZpY2VhY2NvdW50Iiwia3ViZXJuZXRlcy5pby9zZXJ2aWNlYWNjb3VudC9uYW1lc3BhY2UiOiJrdWJlcm5ldGVzLWRhc2hib2FyZCIsImt1YmVybmV0ZXMuaW8vc2VydmljZWFjY291bnQvc2VjcmV0Lm5hbWUiOiJhZG1pbi11c2VyLXRva2VuLW14bXRyIiwia3ViZXJuZXRlcy5pby9zZXJ2aWNlYWNjb3VudC9zZXJ2aWNlLWFjY291bnQubmFtZSI6ImFkbWluLXVzZXIiLCJrdWJlcm5ldGVzLmlvL3NlcnZpY2VhY2NvdW50L3NlcnZpY2UtYWNjb3VudC51aWQiOiI1NGRkYzA0MS1mM2FmLTQxZmEtYTgyNC02YTNlMjlmMGZmYTMiLCJzdWIiOiJzeXN0ZW06c2VydmljZWFjY291bnQ6a3ViZXJuZXRlcy1kYXNoYm9hcmQ6YWRtaW4tdXNlciJ9.osyqbUwS4pLDEhZ0iL0aAu2f5me82bGTEfXEW8ycS5-JRar4iYcWkqhJZ9FhZV47P0WKLT9UWiLcDw1rVPZbMSHrRnFZcRHmLO35tVBaijjvgsgm2X5856G-HS1VNMgQBSZXiQXr1Lt3Dj9JHHksbiLGg-3wRy7HqD-I8JcR1pHZ_ViOqQ1j6WIbvhfEE3FpTuuSPAcjwVNutXAfur6oJktjYAcwMjWTQ4-yMQ2NRSWM7AcJtjp_7p3WwnHmO6fH6LtrGQzmXwHh5ICmei2LrAE2cxwN251aMVnrPGt00Ff4ij2-yLyI4VZOgAsNuPegctm-GuCOTGNX9Ew-o1si_Q
为了在宿主机上能访问,我们需要用VirutalBox管理界面添加一个端口映射:

好了,现在我们可以访问Dashboard了,浏览内输入http://localhost:31694/api/v1/namespaces/kubernetes-dashboard/services/https:kubernetes-dashboard:/proxy/.,可以看到 
NodePort
这个过程比kubectl proxy简单,再安装Dashboard之前,把Service类型改成NodePort即可: 1
2$ wget https://raw.githubusercontent.com/kubernetes/dashboard/v2.0.0-beta8/aio/deploy/recommended.yaml #下载yaml
$ vim recommended.yaml1
查看,Service的随机端口:
NAMESPACE NAME READY STATUS RESTARTS AGE kube-system pod/calico-node-ffn9k 2/2 Running 10 32d kube-system pod/calico-node-fz8v6 2/2 Running 12 32d kube-system pod/calico-node-gvjft 2/2 Running 8 32d kube-system pod/coredns-94d74667-8jp5k 1/1 Running 4 32d kube-system pod/coredns-94d74667-tlph7 1/1 Running 4 32d kube-system pod/etcd-k8s-head 1/1 Running 4 32d kube-system pod/kube-apiserver-k8s-head 1/1 Running 4 32d kube-system pod/kube-controller-manager-k8s-head 1/1 Running 4 32d kube-system pod/kube-proxy-4rsp4 1/1 Running 5 32d kube-system pod/kube-proxy-dccdc 1/1 Running 5 32d kube-system pod/kube-proxy-x82tl 1/1 Running 4 32d kube-system pod/kube-scheduler-k8s-head 1/1 Running 4 32d kubernetes-dashboard pod/dashboard-metrics-scraper-6c554969c6-wmwpt 1/1 Running 0 18m kubernetes-dashboard pod/kubernetes-dashboard-56c5f95c6b-s66g8 1/1 Running 0 18m
NAMESPACE NAME TYPE CLUSTER-IP EXTERNAL-IP PORT(S) AGE default service/kubernetes ClusterIP 10.96.0.1 1
2
3
4
5可以看到暴露端口是**30646**,访问Master节点上的30646端口`https://192.168.205.10:30646`,需要填写的**token**和上面`kubectl proxy`遇到的问题一样,先创建**ServiceAccount**和**ClusterRoleBinding**,然后查看这个账号的token。
#### API Server
首先,我们需要导出p12证书:
生成 client-key-data
grep 'client-key-data' ~/.kube/config | head -n 1 | awk '{print $2}' | base64 -d >> kubecfg.key
生成 p12
openssl pkcs12 -export -clcerts -inkey kubecfg.key -in kubecfg.crt -out kubecfg.p12 -name "kubernetes-client" 1
2
3
4
5
6
7
8
9然后,在在 chrome 导入了 p12 证书(点击“设置”,“管理证书”那里导入)。
访问链接:`https://192.168.205.10:6443/api/v1/namespaces/kubernetes-dashboard/services/https:kubernetes-dashboard:/proxy`,就可以看到**登录界面**了(注意:**新版的Dashboard,命名空间移动到了kubernetes-dashboard中**)

**token**的填写跟上面`kubectl proxy`一样,当然你也可以直接用master节点中`$HOME/.kube/config`文件来登录。
## kubernetes常用命令
创建
kubectl create -f 文件名 ----创建 kubectl replace -f 文件名 [--force] ----重建
删除
kubectl delete -f 文件名 kubectl delete pod pod名 kubectl delete rc rc名 kubectl delete service service名 kubectl delete pod --all kubectl run mybusybox --image=busybox ----启动一个pod kubectl run mybusybox --image=busybox --replicas=5 ----启动多个pod kubectl delete deployments mybusybox ----删除创建的pod kubectl get pods ----列出当前所有的pod kubectl describe pod [PODNAME] ----查看pod的状态 kubectl run mynginx --image=nginx --port=80 --hostport=8000 ----创建带有端口映射的pod kubectl run -i --tty busybox --image=busybox ----创建带有终端的pod ```
参考 * Github——kubernetes-cluster-via-vagrant * Kubernetes – unable to login to the Dashboard * kubernetes-dashboard(1.8.3)部署与踩坑